Do you have loads of devices to provision but not enough time to tap on each screen. If only there was another way.
Typically the enrolment process would be, boot up the device, then tap the screen spot many time until the camera loads, Scan the token, then connect to(and type in the password for) Wifi. Then start the enrolment process.
With a NFC tag, you can save the token and the wifi configuration into the tag, then simply swipe the tag to start the enrolment.
There isn’t much information about this enrolment process for Endpoint Manager. But it can be really handy and save time for the enrolment. But where to start. Let’s check the Microsoft blog about this. https://docs.microsoft.com/en-us/archive/blogs/cbernier/nfc-based-android-enterprise-device-enrollment-with-microsoft-intune (The work in here represents my experience using NFC to enroll the devices. Full credit goes to Chris Baldwin from MS for his blog about the topic. It’s a really good blog post on UEM4all and the MS Site above. )
So what do we need.
- Some NFC Tags. You can use most of the NFC tasks, but make sure they have plenty of space. I bought NTAG216 tags that have 888 writable bytes of data and are writable with a Zebra card printer. (Added bonus to make the cards pretty)
- A NFC Reader / Writer. You can get these for the PC, or take advantage of the one in your phone. You can download the app NFC tool Pro for a few pounds on the play store.
- Some data to write to the NFC Card.
Lets begin by formulating the data. There is lots of coding in these tag, and were borrowing it from the android developer documentation.
The first part is the same for all Endpoint Manager Enrolments.
android.app.extra.PROVISIONING_DEVICE_ADMIN_PACKAGE_DOWNLOAD_LOCATION=https://play.google.com/managed/downloadManagingApp?identifier=setup
android.app.extra.PROVISIONING_DEVICE_ADMIN_SIGNATURE_CHECKSUM=I5YvS0O5hXY46mb01BlRjq4oJJGs2kuUcHvVkAPEXlg
android.app.extra.PROVISIONING_DEVICE_ADMIN_COMPONENT_NAME=com.google.android.apps.work.clouddpc/.receivers.CloudDeviceAdminReceiver
The next part you need is the enrolment token. Go to the Enroment then page and copy the teszct string as is to put at the end of the string.
android.app.extra.PROVISIONING_ADMIN_EXTRAS_BUNDLE=com.google.android.apps.work.clouddpc.EXTRA_ENROLLMENT_TOKEN=<CHANGE TO ENDPOINT MANAGER TOEKN>
Lets also also add in the WiFi configuration to speed things up (don’t forget to enrolling the device on a different Wifi to the ones you want to install). Include all the lines in the token otherwise it won’t wor correctly and you will get an Error. The options for Security are WPA, WEP or None. Once you have the NFC created, you might need to play with the quotes. It worked when I removed them Ann in this format.
android.app.extra.PROVISIONING_WIFI_SSID=”GUEST”
android.app.extra.PROVISIONING_WIFI_SECURITY_TYPE=WPA
android.app.extra.PROVISIONING_WIFI_PASSWORD=MYPASSWORD
We have the data so let’s load up the closest device. Lets load up NFC tool Pro. Open the Write Tab, The select Add Record. Navigate to the bottom of the screen and select Data.
In Content-type, type in application and in the next textbox type in com.android.managedprovisioning
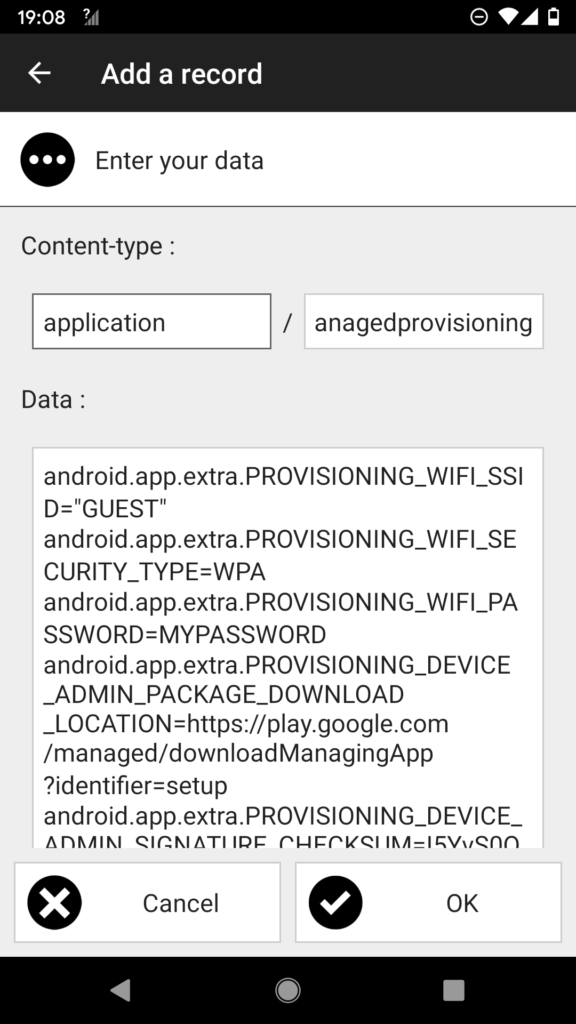
In the Data field you need to put in your entire text string you have created.
android.app.extra.PROVISIONING_DEVICE_ADMIN_PACKAGE_DOWNLOAD_LOCATION=https://play.google.com/managed/downloadManagingApp?identifier=setupD
android.app.extra.PROVISIONING_DEVICE_ADMIN_SIGNATURE_CHECKSUM=I5YvS0O5hXY46mb01BlRjq4oJJGs2kuUcHvVkAPEXlg
android.app.extra.PROVISIONING_DEVICE_ADMIN_COMPONENT_NAME=com.google.android.apps.work.clouddpc/.receivers.CloudDeviceAdminReceiver
android.app.extra.PROVISIONING_ADMIN_EXTRAS_BUNDLE=com.google.android.apps.work.clouddpc.EXTRA_ENROLLMENT_TOKEN=<CHANGE TO ENDPOINT MANAGER TOEKN>
android.app.extra.PROVISIONING_WIFI_SSID=”GUEST” android.app.extra.PROVISIONING_WIFI_SECURITY_TYPE=WPA android.app.extra.PROVISIONING_WIFI_PASSWORD=MYPASSWOR
Press OK once done.
Now let’s write the tag. Press the write button, and then hold the NFG tag on the back of you device for a few seconds until it says write completed.


Before you continue, you might want to save the profile in the NFC tools Pro. Select More Options and Save a Tag Profile. Then give it a good name, You will need to update the NFC tag each time you renew the profile.
Now we have our NFC Enrolment card, lets test it. Find a (another) device, factory rest it. On the first page tap the NFC tag on the device. You will go straight to the enrolling pages. You will have to accept the T&C’s during the enrolment. Let its do it thing & Viola. Device enrolled as device Owner.
If you get an error with the WiFi connection, play with the quotes around game the SSID and the password. For me to worked without the quotes.
Hopefully this will save you some time and effort earn enrolling the devices. Especially if you have lots to install.